
Good afternoon everyone and welcome back to another exciting instalment of my decorating journey!
This week I was struggling to get a clear picture of what I wanted to achieve in terms of my final product. I was inspired by this picture by @edithpatisserie and certainly wanted to do something to that effect. (Side note: if you love simple, beautifully decorated cakes, you should check out their insta, their cakes are gorgeous and I die every time I look at them) So from there, I tried to exactly pin down what I wanted. However, I didn’t fully decide what I wanted until the very last-minute, right before the icing went on.
I wanted to make a simple vanilla cake this week because last week’s cake had a very involved baking process. However, I could not just stick with a simple vanilla cake, that would be too simple. I had to spice it up with a raspberry compote filling!!! MMMMMMM! I adore cakes with a berry filling so I was very excited about this one. Unfortunately, I will probably not taste this one as I’m bringing it to my Junior Youth kids tonight and if you know anything about kids, you’ll know that the cake will be gone in no time! Anyways, I tasted the cake along the way and it was yummy yummy!
Here is the recipe for the cake: (courtesy of my amazingly talented cousin) 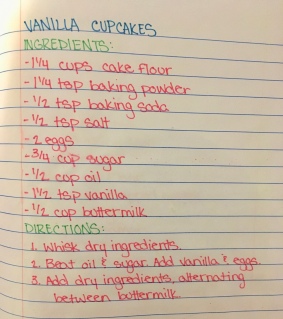
The raspberry compote was a bit of a messy process (in more ways than one…) I watched a video on how to make it and from there I took it into my own hands and didn’t really follow the video. In the end, it turned out pretty good! It was a bit tart but I think it will help cut the sweetness of the icing. If you’re curious, here is the video I watched on how to do it. Super easy! 🙂
Now for the part everyone is actually excited for!! The assembly and decoration. This is also where things started to go wrong. I trimmed the sides of my cake and started to stack them. I piped a little border around the perimeter to keep the raspberry compote contained within the layer…however, the border doesn’t do a whole lot of good if you’re a dummy like me and fill the middle of the cake too full. Let me illustrate:


YIKES. I filled up my cake with the raspberry sauce and plopped the top layer on and began to attempt (key word is attempt) to ice the top layer. Then I noticed that my cake was sliding around and the filling was oozing out the sides…SOS! Part of me just wanted to keep going and ignore it but I had a nagging feeling that if I left it, my cake would have some issues later. So I grabbed the top layer, plopped it, icing side down, onto a plate and began to scoop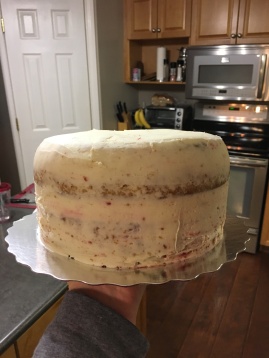 out the excess filling. As you can see from the last two pictures, it was real messy. After I scraped the filling off the top layer and piped an extra border on top of the first one (ensuring that it was nice and high) I tried icing my cake again. Thankfully, this time it went MUCH smoother! CRISIS AVERTED! Once the crumb coat was complete, I sent it off to the freezer to chill for a bit.
For my final layer of frosting, I slathered a ton of icing on my cake and went to town smoothing and levelling it off. When it comes to icing cakes, I tend to be extremely picky and if I would allow myself, I would fiddle with the icing for hours. However, at some point, I just need to call it good and move on. Since I was going for a watercolour cake, my final layer didn’t have to be perfect, just good enough. I decided on a range of blue colours for my watercolour. To achieve this, all I did was dye a large glob of icing blue then from that glob, I took out another glob and added some white to lighten it. I repeated that same process to achieve another slightly lighter shade of blue. In the end, I had 3 different shades of blue.
Instead of explaining what I did next, here is a video of what I actually did:
Essentially I just smeared various colours into my cake in a random order, did some more smearing to blend the colours. Then I just fiddled with it until I was pleased with the result. For the drip portion of the cake, I made a chocolate ganache. It was made with the instruction of this video: (sorry, there seems to be a lot of videos in this post. What are your thoughts on that?? more? less?)
My first drip attempt was semi-successful. I was humbled and learnt that I do not know everything, especially when it comes to quantities in recipes. I thought the recipe didn’t use enough chocolate so I took the liberty of adding some extra. In turn, it caused my ganache to be too thick and it set much too quickly for it to actually drip. So I had to cheat a bit and help my drips out a bit by adding extra blobs down the side. Once my drip had slightly set up, I added some edible pearls around the edge of my cake to add a finishing touch! Et violà! Here is the finished product!


Overall, I’m pretty pleased with how it turned out! Next time I do a filling, I will remember less is more!! I will also not add extra chocolate to my ganache. My sisters were certainly impressed with the cake but less impressed when I told them that it wasn’t for them.
I am also really enjoying this style of learning. I am certainly a visual and hands on type of learner so watching instructional videos then having an opportunity to try it out works beautifully for me! I have found that YouTube is the best place to go when looking for videos on decorating cakes! If you have any other suggestions of where to look or specific channels I should check out, let me know in the comments!
Emily Grace.

Emily,
It is interesting that you say you like to learn visually for your learning project- I am the opposite. I have been doing cooking and I like written instructions way better! Anyway, I think your cake looks great. I have to give you credit for attempting that! Great job.
If you are looking for more recipes I suggest you check out Pinterest or allrecipes.com. These are a couple of the many places you can find great cooking resources to use.
LikeLike
Thanks Michelle! When I read recipes I really struggle to understand what I’m supposed to do. I will certainly check out allrecipes.com, I never thought to look there.
LikeLike
This looks so good! Awesome job, Emily! Can’t wait to see more!
LikeLike
Thank you!
LikeLike
Looks so delicious! I’m hungry~~~
LikeLike
It was so delicious!
LikeLike
Emily, your cake looks delicious!! I agree that being a visual learner you want things to look exactly as planned or shown in a picture; but sometimes it goes a different route… I know when I bake, when it comes to the recipe I alter it (add a little bit of this and that), but your cake is so well put together and the materials you used not only look beautiful but are edible too! Can I have a piece?
LikeLike
Ahaha I would send you a piece if I could!
LikeLike
Do you mind if I ask what kind of cake pan you use?! I am also learning how to bake, but my cakes NEVER get “tall” enough to actually be pretty! Or do you just do several layers?!
LikeLike
I usually do two 8″ cake pans and stack them up with layers of frosting in between to add height! I also use these things called bake even strips and they make the cake rise evenly with no dome! They make a world of a difference! Hope this helps!
LikeLike