
Hello everyone!
So as I said last week, I have a REALLY REALLY good carrot cake recipe to make! (off topic but, am I the only one who ALWAYS spells recipe wrong?? recipIe? No? ok.) I have made it a few times and I always receive multiple compliments and I always respond “Man, it’s not me. It’s all in the recipe!!” But nevertheless, it’s a really good one. AND it’s from Pinterest, it’s a win win. Last week, I used Pinterest for my recipe and inspiration and it went sooo well so I figured I’d give it another go!
The first time I made this, I made it into the individual carrot shapes that the recipe suggests:


I thought it was really well explained and although cutting apart the cake was a bit tricky, the pictures were VERY crucial to my success. One of the things that I love about this particular recipe is the detailed pictures that are provided throughout the entire process. As I have shared in the past, I am a visual learner so I depend on pictures to ensure that my process is going well. I like to compare my creation to the creator’s product to make sure that I’m at least on the right track!
The first time I made this cake, it was almost exactly a year ago. I made it for a friend’s birthday. Instead of using the individual cake design as the recipe suggests, I poured the batter into 2 round cake pans and it worked just as well! Here is what my cake looked like:


At the time, I thought this cake was AMAZING! I remember being so proud of it!
For this week’s cake, I drew inspiration from the cake I made a year ago as well as these images I found on Pinterest: 
All the directions that I needed to make the cake, were provided on the recipe’s website. Including how to melt the orange and green candy melts.
After my cakes were cooled and cut, I filled and stacked them with cream cheese frosting and crushed pineapple. (pineapple is a MUST for me in carrot cake)


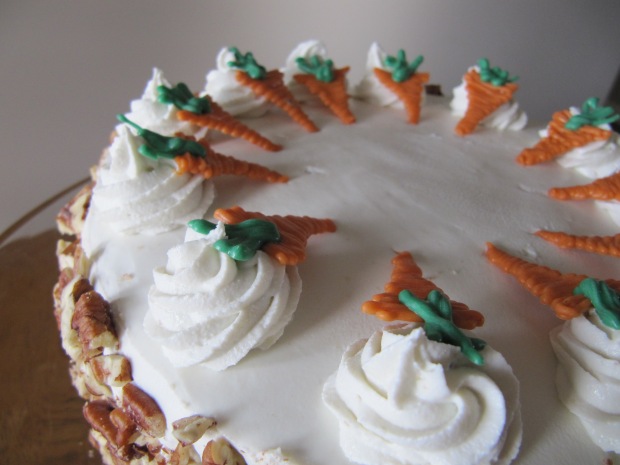
Last time I used cream cheese frosting, it was too runny so the roses that I piped did not hold their shape. This time I added a bit extra icing sugar to make the frosting a bit more stiff. Then I melted my chocolate to create my carrots. I just free-handed a quick little scribble design that slightly resembled a carrot. After I added my final coat of icing, I chopped some walnuts and covered the sides of the cake in the nuts.


Then I used a LVCC 822 tip to create the little dollops of frosting for my carrots to rest on.


And here is my final product:

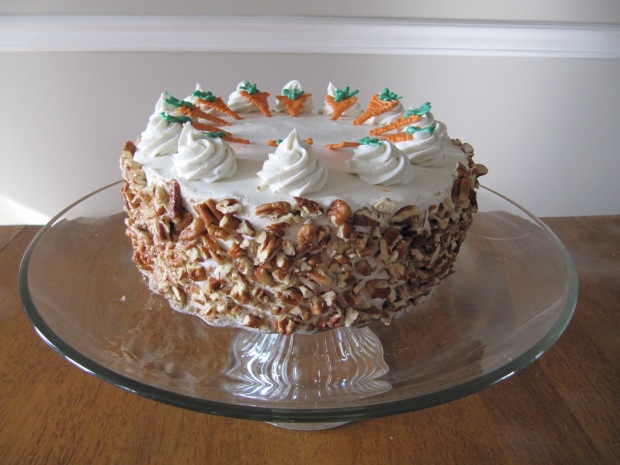

I’d say that there is a significant improvement in cakes hey? I love seeing my progress in the cakes that I’ve created. It just goes to show how much I have learned during this learning project. And it is all achieved through online sources and some experimenting. How cool is it that we can learn a new skill just by watching videos or reading how-to guides online. Technology provides us with so many cool tools to use in so many ways! I look forward to seeing what other things I can create with the help of online teachers!
I’m curious, how are your learning projects coming along? Can you see improvement in your learning? Are you enjoying using online tools to learn a new skill? Let me know in the comments!
Until next time,
Emily Grace.

Hi Emily,
Wow, your cakes are amazing! This one looks like a professional did it! It is amazing to look back at the progress of the semester and see how far we have all come on our learning projects! I love the fact that we can learn so much through watching tutorials and reading how-to guides online! Great job on the cake making!
LikeLike
Thank you! I have certainly improved my skills this semester! I hope to really fine tune them in the future as well. It’s is really interesting to track our progress and compare it.
LikeLike
I can definitely see growth that looks amazing!
LikeLike
Thank you 🙂
LikeLike